ຄວາມຫນາຂອງຜະໜັງຊັ້ນທີ່ບໍ່ສະເໝີກັນຖືເປັນໜຶ່ງໃນບັນຫາຫຼັກໆ ໃນການອອກແບບພິມສີດ, ແລະ ມັນມັກຈະນຳມາ´ສູ່ບັນຫາຕ່າງໆ ເຊັ່ນ: ການເບື້ອງ, ບັນຫາຮອຍຍຸບທີ່ນິຍົມ, ແລະ ຮູໂປ່ງ. ເມື່ອຊິ້ນສ່ວນມີສ່ວນທີ່ຫນາກວ່າ, ມັນຈະໃຊ້ເວລາເຢັນດົນກວ່າບໍລິເວນທີ່ບາງກວ່າ, ຊຶ່ງສ້າງຄວາມເຄັ່ງຕຶງພາຍໃນວັດສະດຸ. ຄວາມເຄັ່ງຕຶງນີ້ນຳໄປສູ່ການເບື້ອງ ໂດຍທີ່ຂະໜາດຈະບິດເບື້ອງໃນຂະນະທີ່ທຸກຢ່າງຖືກຕັ້ງ. ຮອຍຍຸບຈະປາກົດເປັນຮອຍບາດນ້ອຍໆ ຢູ່ເທິງພື້ນຜິວ ເນື່ອງຈາກບ່ອນທີ່ຫນາຫຼຸດລົງຫຼາຍເກີນໄປໃນຂະນະທີ່ກຳລັງເຢັນ. ຮູໂປ່ງເກີດຂຶ້ນເມື່ອອາກາດຖືກຈັບຢູ່ໃນບໍລິເວນທີ່ຫນາເຫຼົ່ານີ້. ບັນຫາທັງໝົດເຫຼົ່ານີ້ເຮັດໃຫ້ຄວາມເຂັ້ມແຂງຂອງຊິ້ນສ່ວນ ແລະ ລັກສະນະພາຍນອກເສຍໄປ, ໝາຍຄວາມວ່າມີຜະລິດຕະພັນທີ່ຖືກປະຕິເສດຫຼາຍຂຶ້ນ ແລະ ຄ່າໃຊ້ຈ່າຍໃນການຜະລິດເພີ່ມຂຶ້ນ. ຕາມທີ່ຜູ້ຊ່ຽວຊານຫຼາຍຄົນລາຍງານ, ປະມານ 45% ຂອງບັນຫາດ້ານຄຸນນະພາບພາຍນອກໃນຜະລິດຕະພັນທີ່ຜະລິດດ້ວຍເຄື່ອງສີດ ສາມາດຕິດຕາມໄດ້ກັບຄວາມຫນາຂອງຜະໜັງຊັ້ນທີ່ບໍ່ສະເໝີກັນໃນບັນດາສ່ວນຕ່າງໆຂອງແມ່ພິມ.
ການໄດ້ຮັບຄວາມຫນາຂອງຜະພາງທີ່ຖືກຕ້ອງນັ້ນມີຄວາມສຳຄັນຫຼາຍໃນຂະບວນການຂຶ້ນຮູບແບບປະທຸ. ເມື່ອຜະພາງມີຄວາມຫນາຢ່າງສອດຄ່ອງ, ພລາສຕິກຈະເຢັນຢ່າງສອດຄ່ອງ ແລະ ລຽບໄຫຼໄປຕາມແບບຢ່າງສະດວກ. ສິ່ງນີ້ຊ່ວຍປ້ອງກັນບັນຫາຕ່າງໆ ເຊັ່ນ: ຄວາມເບີ້ນ ຫຼື ຕີນ້ຳຕາຍທີ່ເປັນບັນຫາທີ່ປາກົດຂຶ້ນຫຼັງຈາກການຜະລິດ. ນອກຈາກນັ້ນ, ແບບຈະຖືກຕື່ມຢ່າງມີປະສິດທິພາບຫຼາຍຂຶ້ນເມື່ອມີຄວາມສອດຄ່ອງໃນທຸກໆພື້ນທີ່, ດັ່ງນັ້ນພວກເຮົາຈະບໍ່ມີບັນຫາການລຽບໄຫຼທີ່ເຮັດໃຫ້ເກີດຈຸດອ່ອນ. ຜູ້ຜະລິດສ່ວນຫຼາຍຈະມຸ່ງໝາຍໃສ່ຜະພາງທີ່ມີຄວາມຫນາປະມານ 1.2 ຫາ 3 ມິນຕີແມັດ, ເຖິງຢ່າງໃດກໍຕາມບໍ່ມີໃຜຕ້ອງການສ່ວນທີ່ແຕກຕ່າງກັນຫຼາຍກວ່າປະມານສີ່ສ່ວນໜຶ່ງ. ຄວາມແຕກຕ່າງນີ້ມີຜົນກະທົບຢ່າງແທ້ຈິງຕໍ່ຂະບວນການໃນໂຮງງານ. ຊິ້ນສ່ວນທີ່ຜະລິດດ້ວຍຜະພາງທີ່ມີຄວາມຫນາສອດຄ່ອງຈະຊ່ວຍຫຼຸດເວລາຂອງຂະບວນການລົງປະມານ 30 ເປີເຊັນ ແລະ ຫຼຸດຜ່ອນຂໍ້ບົກຜ່ອງຢ່າງຫຼວງຫຼາຍ, ບາງຄັ້ງຫຼຸດລົງເຄິ່ງໜຶ່ງ ຖ້າທຽບກັບຊິ້ນສ່ວນທີ່ມີຄວາມຫນາຂອງຜະພາງທີ່ແຕກຕ່າງກັນໄປມາ.
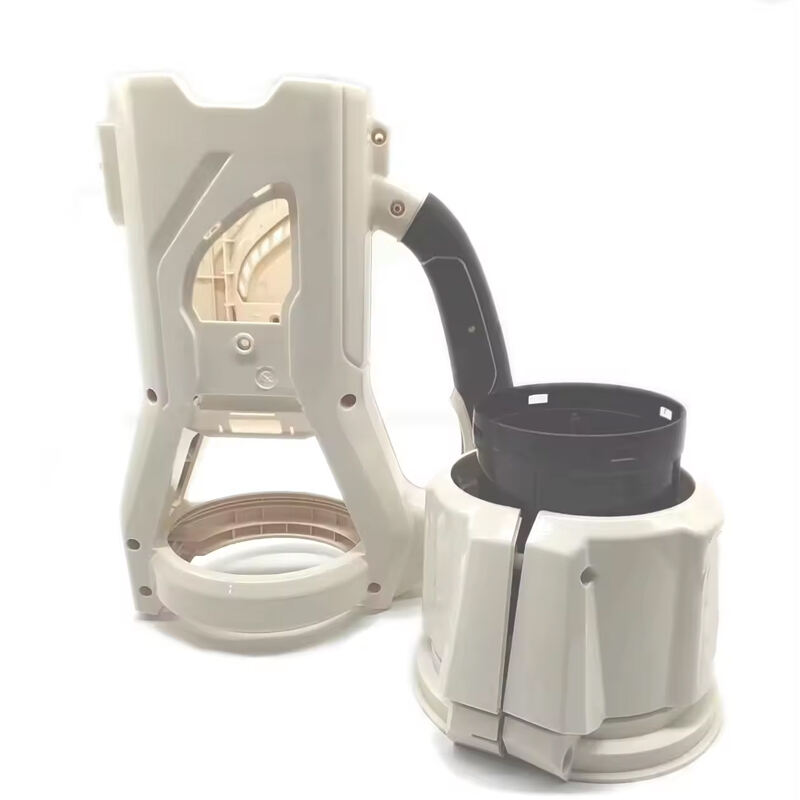
ບໍລິສັດຜະລິດເຄື່ອງໄຟຟ້າໃຊ້ໃນຄົວເຮືອນມີບັນຫາໃຫຍ່ກັບຮອຍຍຸບແລະຮອຍໂຄ້ງທີ່ປາກົດຂຶ້ນໃນຕົວເຄື່ອງພາດສະຕິກ ເນື່ອງຈາກຄວາມຫນາຂອງຜະໜັງສືແຕກຕ່າງກັນຫຼາຍ, ຈາກພຽງ 1.5mm ເຖິງ 4.2mm. ການເຢັນທີ່ບໍ່ສະໝໍ່າສະເໝີນີ້ເຮັດໃຫ້ການຜະລິດມີບັນຫາຫຼາຍຢ່າງ, ລວມທັງຊິ້ນສ່ວນທີ່ຖືກປະຖິ້ມອອກຫຼາຍເກີນໄປ ແລະ ເວລາຂອງແຕ່ລະວົງຈອນທີ່ຍາວກວ່າປົກກະຕິ. ທີມງານວິສະວະກອນໄດ້ແກ້ໄຂບັນຫາດັ່ງກ່າວໂດຍການອອກແບບຊິ້ນສ່ວນໃໝ່ດ້ວຍຜະໜັງສືທີ່ມີຄວາມຫນາ 2mm ຢ່າງສອດຄ່ອງ ແລະ ເພີ່ມບາງສ່ວນທີ່ຖືກເຈาะເພື່ອໃຫ້ມີຄວາມແຂງແຮງຂຶ້ນໂດຍບໍ່ເຮັດໃຫ້ນ້ຳໜັກເພີ່ມຂຶ້ນ. ຫຼັງຈາກການປ່ຽນແປງເຫຼົ່ານີ້, ພວກເຂົາບໍ່ພົບຮອຍຍຸບທີ່ກ້ວຍໃຈອີກຕໍ່ໄປ, ບັນຫາຮອຍໂຄ້ງຫຼຸດລົງປະມານ 85%, ແລະ ສາມາດຫຼຸດເວລາຂອງແຕ່ລະວົງຈອນລົງໄດ້ເກືອບ 1/4. ຖ້າເບິ່ງຄືນ, ມັນຊັດເຈນວ່າການຄວບຄຸມຄວາມຫນາຂອງຜະໜັງສືໃຫ້ຖືກຕ້ອງໄດ້ແກ້ໄຂບັນຫາດ້ານຄຸນນະພາບຫຼາຍຢ່າງພ້ອມກັນ ແລະ ຊ່ວຍໃຫ້ຂະບວນການຜະລິດດຳເນີນໄປຢ່າງສະຫຼາດ.
ນັກອອກແບບມັກໃຊ້ການຂຸດເຈາະພາຍໃນ (core-outs) ແລະ ການຖ່າຍໂອນຢ່າງຄ່ອຍເປັນຄ່ອຍໄປ ເມື່ອບັນລຸຄວາມຫນາທີ່ສອດຄ່ອງກັນບໍ່ໄດ້ ເນື່ອງຈາກເຫດຜົນຕ່າງໆ. Core-outs ພື້ນຖານແລ້ວກໍຄືການລຶບວັດສະດຸສ່ວນເກີນອອກຈາກບັນດາຈຸດທີ່ຫນາ, ແຕ່ແທນທີ່ຈະປ່ອຍໃຫ້ຊິ້ນສ່ວນກາຍເປັນໂຫວ່, ກໍຈະເຮັດໃຫ້ແຂງແຮງຂຶ້ນໂດຍການເພີ່ມຊີ້ ribs ເພື່ອຮັກສາຄວາມແຂງແຮງຂອງຊິ້ນສ່ວນ. ຜົນໄດ້ຮັບແມ່ນຫຍັງ? ຊິ້ນສ່ວນທີ່ເບົາກວ່າ, ເຢັນໄດ້ດີຂຶ້ນ ແລະ ມີໂອກາດໜ້ອຍລົງທີ່ຈະເກີດຮອຍບຸ້ມ (sink marks) ທີ່ເຮົາທຸກຄົນເກີດຄວາມຮຳຄານ. ສຳລັບການຖ່າຍໂອນລະຫວ່າງຄວາມຫນາທີ່ແຕກຕ່າງກັນ, ວິສະວະກອນສ່ວນຫຼາຍຈະໃຊ້ອັດຕາການເບາະ 3:1 ເພາະມັນສ້າງການປ່ຽນແປງທີ່ລຽບ smoother ໂດຍບໍ່ມີການເດ່ງຂຶ້ນຢ່າງທັນໃດທັນໃດ ທີ່ອາດຈະຈັບອາກາດເຂົ້າໄປ ຫຼື ກໍ່ໃຫ້ເກີດຄວາມເຄັ່ງຕຶງໃນບັນດາພື້ນທີ່ສຳຄັນ. ວິທີການເຫຼົ່ານີ້ຊ່ວຍຮັກສາຂະບວນການຜະລິດໃຫ້ດຳເນີນໄປຢ່າງລຽບງ່າຍ ເຖິງແມ່ນວ່າຈະເຮັດກັບຮູບຮ່າງທີ່ສັບຊ້ອນ, ແລະ ຕາມຂໍ້ມູນຈາກອຸດສາຫະກໍາ, ບໍລິສັດຕ່າງໆມັກຈະເຫັນການຫຼຸດຜ່ອນວັດສະດຸທີ່ໃຊ້ລົງປະມານ 15 ຫາ 25 ເປີເຊັນ ໃນຂະນະທີ່ຄຸນນະພາບຂອງຊິ້ນສ່ວນດີຂຶ້ນຢ່າງຊັດເຈນ.
ຊອບແວສຳລັບການຈຳລອງການຂຶ້ນຮູບດ້ວຍການສົ່ງເຂົ້າໄດ້ປ່ຽນວິທີການທີ່ພວກເຮົາໃຊ້ໃນການເພີ່ມປະສິດທິພາບຄວາມຫນາຂອງຜະໜັງສືໃນຂະບວນການຜະລິດ. ລະບົບໃໝ່ສາມາດຄາດເດົາໄດ້ວ່າວັດສະດຸຈະໄຫຼແນວໃດ, ຕິດຕາມອັດຕາການເຢັນ, ສຳຜັດຈຸດບົກຜ່ອງທີ່ອາດເກີດຂຶ້ນກ່ອນທີ່ຈະເລີ່ມຂະບວນການຜະລິດເຄື່ອງມື, ເຮັດໃຫ້ວິສະວະກອນສາມາດທົດສອບການຈັດຮູບແບບຜະໜັງສືຕ່າງໆໄດ້ໂດຍຜ່ານການຈຳລອງ. ເມື່ອເບິ່ງຫຼາຍໆ ຕົວເລືອກການອອກແບບຄຽງຄູ່ກັນ, ຜູ້ຊ່ຽວຊານມັກຈະພົບວິທີແກ້ໄຂທີ່ຕອບສະໜອງຄວາມຕ້ອງການດ້ານຄວາມແຂງແຮງ ແລະ ຂໍ້ຈຳກັດດ້ານການຜະລິດ. ລາຍງານຂະແໜງການຊີ້ໃຫ້ເຫັນວ່າ ບັນດາບໍລິສັດທີ່ໃຊ້ການຈຳລອງເຫຼົ່ານີ້ ສາມາດຫຼຸດບັນຫາຄວາມຫນາຂອງຜະໜັງສືລົງໄດ້ປະມານ 70 ເປີເຊັນ ແລະ ນຳຜະລິດຕະພັນອອກສູ່ຕະຫຼາດໄດ້ໄວຂຶ້ນປະມານ 40% ຖ້ຽວວິທີດັ້ງເດີມ. ບັນດາຜູ້ຜະລິດທີ່ກ້າວໜ້າສ່ວນຫຼາຍໃນປັດຈຸບັນຖືການຈຳລອງວ່າເປັນສິ່ງຈຳເປັນໃນຂະບວນການພັດທະນາຂອງພວກເຂົາ, ເຖິງຢ່າງໃດກໍຕາມຍັງມີພື້ນທີ່ໃຫ້ດີຂຶ້ນເນື່ອງຈາກມີເຕັກໂນໂລຊີໃໝ່ໆ ເກີດຂຶ້ນໃນຂະແໜງການທີ່ພັດທະນາຢ່າງວ່ອງໄວນີ້.
ເມື່ອຊິ້ນສ່ວນຕິດຢູ່ໃນແມ່ພິມ ຫຼື ມີຮອຍແຕກເວລາຖອນອອກ, ມັກຈະເກີດຈາກມຸມຖອນ (draft angle) ບໍ່ຖືກຕ້ອງ. ບັນຫານີ້ຈະຮ້າຍແຮງຂຶ້ນເມື່ອບໍ່ມີການເຮັດມຸມເບາະພຽງພໍ ເນື່ອງຈາກຊິ້ນສ່ວນເຄື່ອນໄຫວຖູກຝາແມ່ພິມຫຼາຍເກີນໄປ, ໂດຍສະເພາະໃນບັນດາສ່ວນທີ່ເລິກກວ່າ ຫຼື ມີພື້ນຜິວເປັນລາຍ. ຖ້າເບິ່ງຈາກສິ່ງທີ່ເກີດຂຶ້ນໃນໂຮງງານຕ່າງໆໃນອຸດສາຫະກໍາ, ປະມານ 15 ໃນທຸກໆ 100 ຊິ້ນສ່ວນທີ່ຖືກປະຕິເສດຈາກການຂຶ້ນຮູບແບບອັດລົງແມ່ພິມ ແມ່ນມາຈາກບັນຫາການຖອນອອກ, ແລະ ປະມານສອງສ່ວນສາມຂອງບັນຫາເຫຼົ່ານັ້ນມາຈາກການອອກແບບມຸມຖອນທີ່ບໍ່ດີ. ບັນຫານີ້ກາຍເປັນສິ່ງທີ່ສັບສົນຂຶ້ນເມື່ອມີການໃຊ້ພື້ນຜິວເປັນລາຍ ເຊິ່ງຕ້ອງການມຸມຖອນປະມານ 3 ຫາ 5 ອົງສາ ເມື່ອປຽບທຽບກັບພຽງ 1 ຫາ 2 ອົງສາສໍາລັບພື້ນຜິວເລຽບໆ. ການເຮັດໃຫ້ຖືກຕ້ອງນັ້ນມີຄວາມສໍາຄັນຫຼາຍຕໍ່ຜູ້ຜະລິດທີ່ພະຍາຍາມຫຼີກລ່ຽງການຢຸດຜະລິດທີ່ເສຍຄ່າ ແລະ ບັນຫາການຄວບຄຸມຄຸນນະພາບໃນອະນາຄົດ.
ມຸມເບາະ, ຫຼື ມຸມທີ່ພວກເຮົາຕັ້ງໃຈເອียงລົງໃນຜະໜັງສືຕັ້ງ, ຊ່ວຍໃຫ້ຖອດຊິ້ນສ່ວນອອກຈາກແມ່ພິມໄດ້ງ່າຍຂຶ້ນໂດຍບໍ່ມີບັນຫາການເຄື່ອນໄຫວຍ້ອນມີພື້ນທີ່ສໍາຜັດໜ້ອຍລົງ. ຜູ້ຊ່ຽວຊານສ່ວນຫຼາຍໃນອຸດສາຫະກໍາແນະນໍາໃຫ້ເລີ່ມຈາກມຸມປະມານ 1 ອົງສາຕໍ່ແຕ່ລະນິ້ວທີ່ຊິ້ນສ່ວນເຂົ້າໄປໃນແມ່ພິມ, ແຕ່ບາງພື້ນທີ່ຕ້ອງການມຸມເອີ້ນກວ່າເຊັ່ນ 3 ອົງສາ ຫຼື ຫຼາຍກວ່ານັ້ນເມື່ອຈັດການກັບຈຸດທີ່ຍາກ ຫຼື ພື້ນຜິວທີ່ມີເນື້ອສຳຜັດ. ລັດເບິ່ງມຸມ ຫຼື ສ່ວນເວົ້າ (fillets) ກໍເຮັດວຽກຄ້າຍຄືກັນແຕ່ສໍາລັບຂອງແທນທີ່ຈະເປັນຂ້າງ. ມຸມທີ່ແຫຼມແມ່ນເກືອບຈະເປັນບັນຫາທີ່ກໍາລັງຈະເກີດຂຶ້ນຍ້ອນມັນສ້າງຈຸດເຄັ່ງຕຶງ ແລະ ຂວາງວັດສະດຸບໍ່ໃຫ້ໄຫຼຜ່ານຫ້ອງແມ່ພິມຢ່າງຖືກຕ້ອງ. ເມື່ອມຸມຖືກເຮັດໃຫ້ກົມ, ຊິ້ນສ່ວນຈະຖືກຖອດອອກໄດ້ງ່າຍໂດຍບໍ່ຕິດ ຫຼື ພັງເສຍໃນຂະນະຖອດອອກ. ນອກຈາກນັ້ນ, ຂອງທີ່ກົມຍັງຊ່ວຍໃຫ້ວັດສະດຸເຕີມເຕັມໄດ້ດີຕັ້ງແຕ່ເລີ່ມຕົ້ນ ແລະ ຍັງເຮັດໃຫ້ຜະລິດຕະພັນສຳເລັດຮູບແຂງແຮງຂຶ້ນໂດຍລວມ.
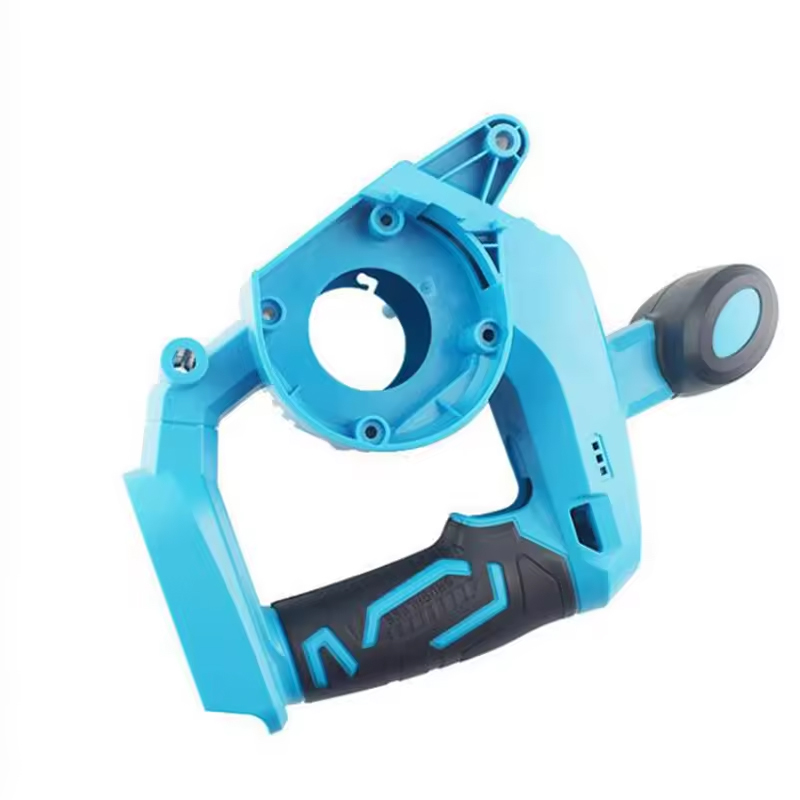
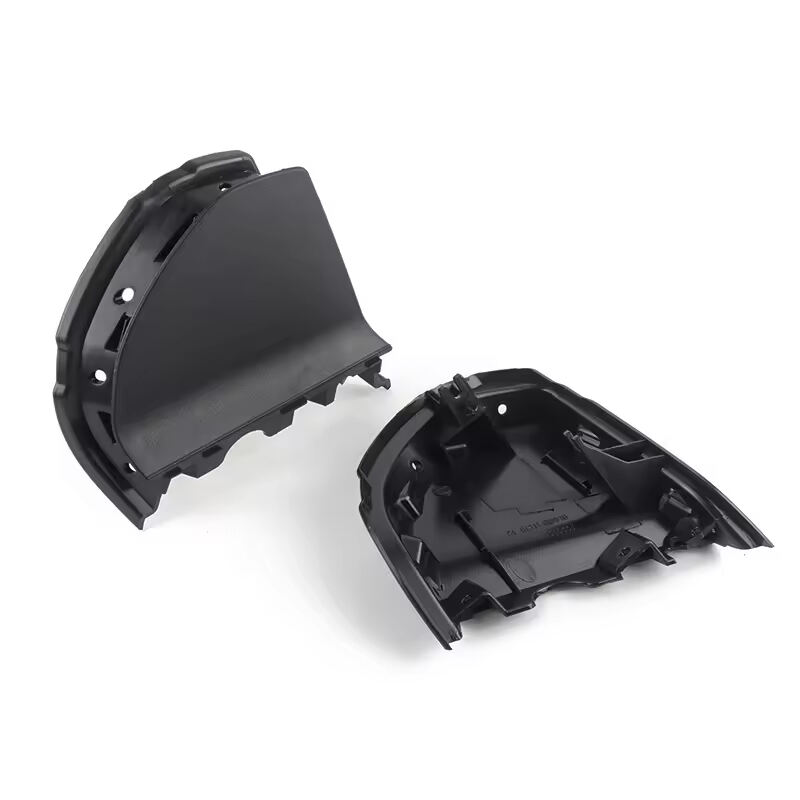
ຜູ້ຜະລິດຊິ້ນສ່ວນລົດຄັນໜຶ່ງ ມີບັນຫາຕະຫຼອດເວລາກັບຊິ້ນສ່ວນປູມພາຍໃນ. ພວກເຂົາມີບັນຫາຢ່າງຕໍ່ເນື່ອງກ່ຽວກັບການຂີດຂົ scratch ຜິວພາຍນອກໃນຂະນະການຜະລິດ ແລະ ການລົງທຶນທີ່ບໍ່ໄດ້ວາງແຜນໄວ້ ເຊິ່ງເຮັດໃຫ້ເສຍເງິນ. ເມື່ອພິຈາລະນາການອອກແບບແມ່ພິມດັ້ງເດີມ, ມັນກໍຊັດເຈນວ່າເປັນຫຍັງທຸກຢ່າງຈຶ່ງບໍ່ເຮັດວຽກໄດ້ດີ. ນັກອອກແບບໄດ້ກຳນົດມຸມຖອນແມ່ພິມພຽງ 0.5 ອົງສາໃນບັນດາບໍລິເວນທີ່ມີພື້ນຜິວເປັນລາຍເລິກ, ພ້ອມທັງມີມຸມເຂົ້າຂ້າງທີ່ແຫຼມຫຼາຍໃນທຸກບ່ອນຂອງຊິ້ນງານ. ເມື່ອພວກເຂົາກັບໄປທົບທວນແລະປັບປຸງໃໝ່, ໂດຍແນ່ໃຈວ່າທຸກໆພື້ນຜິວມີມຸມຖອນແມ່ພິມ 3 ອົງສາຢ່າງສອດຄ່ອງ ແລະ ປ່ຽນມຸມເຂົ້າຂ້າງໃຫ້ເປັນມົນດ້ວຍຮັດສີ 1.5mm, ສິ່ງໜຶ່ງທີ່ໜ້າສົນໃຈກໍເກີດຂຶ້ນ. ກຳລັງຖອນຊິ້ນງານອອກຈາກແມ່ພິມຫຼຸດລົງປະມານ 40 ເປີເຊັນ, ເຊິ່ງໝາຍຄວາມວ່າມີຜົນກະທົບໜ້ອຍລົງຕໍ່ອຸປະກອນ. ອັດຕາຂໍບກົກກໍຫຼຸດລົງຢ່າງຫຼວງຫຼາຍ, ຈາກປະມານ 12% ຫຼຸດລົງເຫຼືອຕ່ຳກວ່າ 2%. ນອກຈາກການແກ້ໄຂບັນຫາທີ່ເກີດຂຶ້ນທັນທີ, ຮູບຮ່າງໃໝ່ນີ້ຍັງຊ່ວຍປັບປຸງການໄຫຼຂອງຢາງພາລາໃນແມ່ພິມອີກດ້ວຍ. ບໍ່ມີເສັ້ນໄຫຼທີ່ບໍ່ງາມປາກົດໃນຊິ້ນງານສຳເລັດຮູບອີກຕໍ່ໄປ, ແລະ ທີ່ດີທີ່ສຸດກໍຄື ພວກເຂົາສາມາດຂ້າມຂັ້ນຕອນການປັບແຕ່ງເພີ່ມເຕີມທີ່ເພີ່ມທັງເວລາ ແລະ ຄ່າໃຊ້ຈ່າຍໃນການຜະລິດ.
ການໃຊ້ມຸມຖອນມາດຕະຖານຕາມປະເພດຂອງວັດສະດຸທີ່ພວກເຮົາກໍາລັງໃຊ້ ແລະ ລະດັບຄວາມກົດແຫນ້ນ ຫຼື ຄວາມລຽບຂອງຜິວນັ້ນ ສາມາດຊ່ວຍປ້ອງກັນບັນຫາການຖອນອອກໄດ້ຕັ້ງແຕ່ເລີ່ມຕົ້ນການຜະລິດ. ຜິວນອກທີ່ລຽບມັກຕ້ອງການມຸມຖອນປະມານ 1 ອົງສາ ຕໍ່ແຕ່ລະນິ້ວສູງ, ແຕ່ຖ້າມີພື້ນຜິວເປັນເມັດ ພວກເຮົາຈະຕ້ອງໃຊ້ມຸມຖອນລະຫວ່າງ 3 ຫາ 5 ອົງສາ ຂຶ້ນກັບລະດັບຄວາມເດັ່ນຂອງເມັດນັ້ນ. ວັດສະດຸພລາສຕິກດ້ານວິສະວະກໍາທີ່ນິຍົມທີ່ສຸດເຊັ່ນ: ວັດສະດຸ ABS ແລະ ໂພລີຄາບອນເນດ (polycarbonate) ມັກເຮັດວຽກໄດ້ດີກັບມຸມຖອນລະຫວ່າງ 1 ຫາ 2 ອົງສາ. ວັດສະດຸຍືດຫຍຸ່ນມັກຕ້ອງການພື້ນທີ່ຫຼາຍກວ່າເລັກນ້ອຍ, ດັ່ງນັ້ນການເພີ່ມພື້ນທີ່ຖອນອອກຈະຊ່ວຍໃຫ້ມັນຖອນອອກໄດ້ໂດຍບໍ່ຕິດ. ແນ່ໃຈວ່າມຸມຖອນທັງໝົດນັ້ນຕ້ອງຢູ່ໃນທິດທາງທີ່ຄູ່ມວດຖຸແຍກອອກຈິງໆ ເພື່ອຮັກສາໃຫ້ທຸກຢ່າງຖອນອອກຢ່າງສະເໝີກັນ ແທນທີ່ຈະຕິດຢູ່ດ້ານດຽວ. ອີກສິ່ງໜຶ່ງທີ່ຄວນກ່າວເຖິງກໍຄືມຸມດ້ານໃນ – ການເຮັດໃຫ້ມັນເປັນຮູບເຄິ່ງວົງມົນ ດ້ວຍຮັດສຸດປະມານ 0.5 ຫາ 1 ມິນລີແມັດ ຈະຊ່ວຍຫຼຸດຈຸດຄວາມເຄັ່ງຕຶງ ແລະ ຊ່ວຍໃຫ້ວັດສະດຸລະລາຍໄຫຼເຂົ້າໄປໃນຖ້ໍາມວດຖຸໄດ້ດີຂຶ້ນ.
ຊີ້ນສ່ວນແຂງທີ່ອອກແບບບໍ່ດີມັກຈະເຮັດໃຫ້ເກີດຕຳຫຼຸດທີ່ພວກເຮົາມັກເຫັນກັນຢູ່ຕາມຊິ້ນສ່ວນພລາສຕິກ, ພ້ອມທັງເຮັດໃຫ້ໂຄງສ້າງອ່ອນຕົວລົງ. ຖ້າຊີ້ນສ່ວນແຂງມີຄວາມໜາຫຼາຍກວ່າເຄິ່ງໜຶ່ງຂອງຄວາມໜາຂອງຜິວ, ມັນຈະໃຊ້ເວລາຍາວກວ່າໃນການເຢັນເມື່ອປຽບທຽບກັບສ່ວນອື່ນໆຂອງຊິ້ນສ່ວນ. ຄວາມແຕກຕ່າງນີ້ຈະເຮັດໃຫ້ວັດສະດຸຫົດຕົວເຂົ້າໃນລະຫວ່າງຂະບວນການເຢັນ, ເຮັດໃຫ້ເກີດບາດແຜທີ່ບໍ່ງາມເທິງຜິວ. ຊີ້ນສ່ວນແຂງທີ່ສັ້ນ, ທີ່ຖືກຈັດໄວ້ຫ່າງກັນຫຼາຍເກີນໄປ, ຫຼື ບໍ່ໄດ້ຮັບການຮັບນ້ຳໜັກຢ່າງເໝາະສົມ, ກໍຈະບໍ່ສາມາດເຮັດໜ້າທີ່ໄດ້ຢ່າງຖືກຕ້ອງ. ຊິ້ນສ່ວນທີ່ຜະລິດດ້ວຍວິທີນີ້ມັກຈະງໍໄດ້ງ່າຍ ຫຼື ແມ້ກະທັ້ງແຕກຫັກເມື່ອຖືກກົດດັນ. ສຳລັບຜະລິດຕະພັນທີ່ຮູບລັກສະນະມີຄວາມໝາຍ ແລະ ການເຮັດວຽກມີຄວາມສຳຄັນ, ບັນຫາເຫຼົ່ານີ້ສາມາດເຮັດໃຫ້ຜູ້ຜະລິດມີບັນຫາໃນການບັນລຸມາດຕະຖານຄຸນນະພາບ.
ການອອກແບບຊີ້ນສ່ວນ rib ຢ່າງຖືກຕ້ອງຕ້ອງປະຕິບັດຕາມກົດເລກຮູບສາມຫຼ່ຽມທີ່ກໍານົດ. ສໍາລັບການນໍາໃຊ້ສ່ວນໃຫຍ່, ຊີ້ນສ່ວນ rib ຈະເຮັດວຽກໄດ້ດີທີ່ສຸດເມື່ອມີຂະໜາດປະມານ 40 ຫາ 60 ເປີເຊັນຂອງຄວາມໜາຂອງຜົນກໍາແພງຫຼັກ. ຖ້າເຮັດວຽກກັບພື້ນຜິວເງົາ, ການໃຊ້ຂະໜາດໃກ້ຄຽງກັບ 40% ຈະຊ່ວຍປິດບັງຮອຍຍຸບທີ່ບໍ່ຕ້ອງການໄດ້ດີຂຶ້ນ. ໃນເງື່ອນໄຂຄວາມສູງ, ຢ່າໃຊ້ຄວາມສູງເກີນ 2.5 ຫາ 3 ເທົ່າຂອງຄວາມໜາຂອງຜົນກໍາແພງ ມິນທັດການຕື່ມວັດສະດຸອາດເກີດບັນຫາ ແລະ ຊີ້ນສ່ວນອາດຈະເບື້ອງໜ້າໃນຂະນະການຜະລິດ. ການເພີ່ມຮັດສຸກົມນ້ອຍໆທີ່ຖານ (ປະມານໜຶ່ງສ່ວນສີ່ຫາເຄິ່ງໜຶ່ງຂອງຄວາມໜາຂອງຜົນກໍາແພງ) ຈະເຮັດໃຫ້ແຕກຕ່າງຢ່າງຫຼວງຫຼາຍໃນການແຈກຢາຍຈຸດຄວາມເຄັ່ງຕຶງ ແລະ ປ້ອງກັນການແຕກຫັກໃນອະນາຄົດ. ຢ່າລືມເພີ່ມມຸມ draft ດ້ວຍ - ບ່ອນໃດກໍຕາມລະຫວ່າງເຄິ່ງໜຶ່ງໂດຍສາມເທົ່າກັບໜຶ່ງຈຸດຫ້າໂດຍສາມເທົ່າຈະເຮັດວຽກໄດ້ດີໃນການຊ່ວຍໃຫ້ຊີ້ນສ່ວນອອກຈາກແມ່ພິມຢ່າງສະອາດ. ມິຕິທັງໝົດເຫຼົ່ານີ້ມີຄວາມໝາຍຍ້ອນວ່າມັນມີຜົນກະທົບຕໍ່ການເຢັນຢ່າງສະເໝີພາບ, ວິທີການທີ່ວັດສະດຸໄຫຼຜ່ານແມ່ພິມ, ແລະ ສຸດທ້າຍກໍ່ຈະໃຫ້ເຮົາໄດ້ຈຸດສົມດຸນທີ່ດີທີ່ສຸດລະຫວ່າງຄວາມແຂງແຮງ ແລະ ປະສິດທິພາບດ້ານນ້ຳໜັກ.
ແທນທີ່ຈະເຮັດໃຫ້ຊີ້ ribs ນັ້ນຫນາຂຶ້ນງ່າຍໆເພື່ອເພີ່ມຄວາມແຂງແຮງ, ນັກອອກແບບທີ່ມີປະສົບການມັກແນະນຳໃຫ້ໃຊ້ ribs ທີ່ບາງລົງຫຼາຍອັນ ແລະ ວາງຫ່າງກັນປະມານ 2 ຫາ 3 ເທົ່າຂອງຄວາມຫນາຂອງຜິວ. ວິທີການນີ້ຊ່ວຍແຜ່ກະຈາຍແຮງໄດ້ດີຂຶ້ນໃນຕົວຊິ້ນສ່ວນ ໃນຂະນະທີ່ຮັກສາອັດຕາການເຢັນໃຫ້ຄົງທີ່ໃນລະຫວ່າງການຜະລິດ. ເມື່ອເຮັດວຽກກັບ bosses, ຜູ້ຊ່ຽວຊານສ່ວນຫຼາຍຈະຕັ້ງເປົ້າໝາຍໃຫ້ຜົນຜ່ານຜິວປະມານ 60 ຫາ 80% ຂອງຄວາມຫນາມາດຕະຖານ, ແລ້ວເພີ່ມການເສີມແຮງໂດຍໃຊ້ gussets ຫຼື ribs ທີ່ເຊື່ອມຕໍ່ໃນບັນດາຈຸດທີ່ຕ້ອງການ. Core outs ແມ່ນວິທີການອັນໜຶ່ງທີ່ດີເຊິ່ງຊ່ວຍຫຼຸດຜ່ອນວັດສະດຸສ່ວນເກີນໃນບັນດາບໍລິເວນທີ່ຫນາ, ເຊິ່ງບໍ່ພຽງແຕ່ຊ່ວຍເຮັດໃຫ້ເວລາການຜະລິດສັ້ນລົງ ແຕ່ຍັງຊ່ວຍຫຼຸດຜ່ອນຄວາມສ່ຽງຂອງການເກີດ sink marks. ກ່ອນທີ່ຈະຕັດສິນໃຈອອກແບບສຸດທ້າຍ, ການດຳເນີນການສິມູເລດຜ່ານຊອບແວພິເສດໄດ້ກາຍເປັນການປະຕິບັດມາດຕະຖານໃນປັດຈຸບັນ. ໂປຣແກຣມເຫຼົ່ານີ້ສາມາດຈັບຂໍ້ຜິດພາດທີ່ອາດເກີດຂຶ້ນກ່ອນທີ່ຈະມີການຜະລິດເຄື່ອງມື, ໃຫ້ວິສະວະກອນສາມາດແກ້ໄຂບັນຫາຜ່ານການທົດສອບການຂຶ້ນຮູບແບບຈິງ. ຜົນໄດ້ຮັບ? ຊິ້ນສ່ວນທີ່ມີຮູບລັກສະນະງົດງາມໃນດ້ານພື້ນຜິວ ແຕ່ຍັງຄົງຮັກສາຄວາມແຂງແຮງໃນດ້ານໂຄງສ້າງໄດ້ໃນໄລຍະຍາວ.
ເມື່ອໃຜກໍຕາມທີ່ບໍ່ວາງແຜນສຳລັບ undercut ຢ່າງຖືກຕ້ອງ, ມັນຈະເຮັດໃຫ້ຄວາມຊັບຊ້ອນຂອງແມ່ພິມເສຍຫາຍ ແລະ ສົ່ງຜົນໃຫ້ຄ່າໃຊ້ຈ່າຍເພີ່ມຂຶ້ນຢ່າງຫຼວງຫຼາຍ. ໃນຫຼາຍໆກໍລະນີ, ທຸກໆ undercut ຕ້ອງການກົນໄກດຳເນີນງານຂ້າງທາງໃນຮູບແບບໃດຮູບແບບໜຶ່ງເພີ່ມເຂົ້າໃນເຄື່ອງມື. ແລະ ຊິ້ນສ່ວນເພີ່ມເຕີມເຫຼົ່ານີ້ສາມາດເພີ່ມຄ່າໃຊ້ຈ່າຍໄດ້ປະມານ 15% ຫາ 30% ສຳລັບແຕ່ລະອັນທີ່ຕ້ອງການ. ນອກຈາກນັ້ນ, ກົນໄກເຫຼົ່ານີ້ຕ້ອງໃຊ້ເວລາດົນກວ່າໃນການຕິດຕັ້ງ, ຕ້ອງການເວລາຫຼາຍຂຶ້ນໃນການບຳລຸງຮັກສາຕະຫຼອດໄລຍະເວລາ, ແລະ ເຮັດໃຫ້ລະບົບມີແນວໂນ້ມທີ່ຈະຂັດຂ້ອງໄດ້ງ່າຍຂຶ້ນໂດຍທົ່ວໄປ. ນັ້ນແມ່ນເຫດຜົນທີ່ນັກອອກແບບທີ່ມີຄວາມສະຫຼາດຈະພະຍາຍາມກວດພົບບັນຫາ potential undercuts ໃນຂັ້ນຕອນຕົ້ນໆຂອງການອອກແບບ. ການແກ້ໄຂບັນຫາເຫຼົ່ານີ້ໃນຂັ້ນຕອນຕົ້ນຈະຊ່ວຍໃຫ້ການຜະລິດມີຄວາມຄຸ້ມຄ່າ ແລະ ນິຍົມໃນໄລຍະຍາວ.
ບ່ອນທີ່ເສັ້ນແຍກໄປມີຄວາມສຳຄັນຫຼາຍໃນການຜະລິດພິມ ເນື່ອງຈາກມັນເປັນບ່ອນທີ່ສອງຊິ້ນສ່ວນແຍກອອກຈາກກັນ. ເມື່ອນັກອອກແບບຕັ້ງເສັ້ນດັ່ງກ່າວຕາມເສັ້ນໂຄ້ງທຳມະຊາດຂອງຊິ້ນສ່ວນ, ພວກເຂົາມັກຈະກຳຈັດບັນຫາການຕິດຂັດທີ່ເຮັດໃຫ້ເກີດບັນຫາຫຼາຍໃນຂະບວນການຜະລິດ. ສິ່ງນີ້ໝາຍຄວາມວ່າຈຳນວນການເຄື່ອນໄຫວຂ້າງໜ້າຈະຫຼຸດລົງ ເຊິ່ງຊ່ວຍປະຢັດເວລາ ແລະ ຄ່າໃຊ້ຈ່າຍໃນການຜະລິດເຄື່ອງມື. ການຈັດຕຳແໜ່ງໃຫ້ຖືກຕ້ອງກໍສົ່ງຜົນຫຼາຍດ້ານເຊັ່ນກັນ. ປະຕູເຮັດວຽກໄດ້ດີຂຶ້ນ, ລະບົບເຢັນເຮັດວຽກໄດ້ຢ່າງຖືກຕ້ອງ, ແລະ ຊິ້ນສ່ວນຖືກຂັບອອກຈາກພິມຢ່າງລຽບງ່າຍ. ປັດໃຈທັງໝົດເຫຼົ່ານີ້ຊ່ວຍໃຫ້ຂະບວນການຜະລິດມີຄວາມໝັ້ນຄົງຫຼາຍຂຶ້ນ ແລະ ສຸດທ້າຍຜະລິດຊິ້ນສ່ວນທີ່ມີຄຸນນະພາບສູງຂຶ້ນ ໂດຍສອດຄ່ອງກັບຂໍ້ກຳນົດຢ່າງຕໍ່ເນື່ອງ.
ບໍລິສັດເຄື່ອງໄຟຟ້າໃນຄົວເຮືອນແຫ່ງໜຶ່ງໄດ້ປັບປຸງຜະລິດຕະພັນທີ່ມີການປົກຫຸ້ມມາເມື່ອບໍ່ດົນມານີ້ ໂດຍທີ່ຕ້ອງການກົນຈັກການເຄື່ອນໄຫວຂອງດ້ານຂ້າງຫຼາຍຢ່າງພຽງແຕ່ເພື່ອໃຫ້ຟັງຊັ່ນການລ໋ອກຕົວຈັບເຂົ້າກັນໄດ້ເຮັດວຽກໄດ້ຖືກຕ້ອງ. ເມື່ອທີມງານວິສະວະກອນປ່ຽນຈຸດແຍກຂອງຊິ້ນສ່ວນ ແລະ ປັບຮູບຮ່າງຂອງຕົວຈັບເຂົ້າກັນ, ພວກເຂົາສາມາດກຳຈັດບັນຫາ undercut ທັງໝົດໄດ້. ສິ່ງນີ້ໝາຍເຖິງຫຍັງ? ຄ່າໃຊ້ຈ່າຍດ້ານເຄື່ອງມືຫຼຸດລົງປະມານ 40 ເປີເຊັນ, ຊິ້ນສ່ວນຖືກຂັບອອກຢ່າງສອດຄ່ອງຫຼາຍຂຶ້ນໃນຂະນະການຜະລິດ, ແລະ ວົງຈອນການຜະລິດແຕ່ລະອັນກໍໃຊ້ເວລາໜ້ອຍລົງປະມານ 12% ອີກດ້ວຍ. ສ່ວນທີ່ດີທີ່ສຸດ? ບໍ່ມີການປັບປຸງໃດໆເຫຼົ່ານີ້ທີ່ມາພ້ອມກັບການເສຍສະລະສິ່ງທີ່ຜະລິດຕະພັນຄວນຈະເຮັດ. ການອອກແບບໃໝ່ແບບນີ້ສະແດງໃຫ້ເຫັນຢ່າງຊັດເຈນວ່າ ການປ່ຽນແປງທີ່ມີເຫດຜົນໃນການອອກແບບຜະລິດຕະພັນສາມາດເຮັດໃຫ້ມີຄວາມແຕກຕ່າງຢ່າງໃດ ໃນເວລາທີ່ກ່ຽວຂ້ອງກັບການຜະລິດຢ່າງມີປະສິດທິພາບໂດຍບໍ່ຕ້ອງເສຍສະລະຄຸນນະພາບ.
ເມື່ອປະຕູບໍ່ໄດ້ຖືກຈັດວາງຢູ່ໃນຕຳແຫນ່ງທີ່ຖືກຕ້ອງລະຫວ່າງຂະບວນການຂຶ້ນຮູບ, ບັນຫາຫຼາຍຢ່າງຈະເກີດຂຶ້ນເລື້ອຍໆ ລວມທັງເສັ້ນຕຳໜິ, ປະກົດການພຸ່ງ, ແລະ ຊິ້ນສ່ວນທີ່ບໍ່ຖືກຕື່ມເຕັມຢ່າງຄົບຖ້ວນ. ເສັ້ນຕຳໜິເກີດຂຶ້ນເມື່ອແຜ່ນວັດສະດຸທີ່ລະລາຍແລ້ວມາປະສົມກັນຫຼັງຈາກໄຫຼອ້ອມວັດຖຸໃນເສັ້ນທາງຂອງມັນ, ເຊິ່ງເຮັດໃຫ້ເກີດບັນດາບໍລິເວນທີ່ອ່ອນແອກວ່າທີ່ຄວນຈະເປັນ ແລະ ມີໂອກາດແຕກຫັກໄດ້ງ່າຍເມື່ອຖືກກົດດັນ. ປະກົດການພຸ່ງກໍເປັນບັນຫາອີກຢ່າງໜຶ່ງທີ່ຍາກຈະຈັດການ. ມັນເກີດຂຶ້ນເມື່ອຢາງພາລາຮ້ອນພຸ່ງເຂົ້າໄປໃນຖ້ຽວຂຶ້ນຮູບດ້ວຍຄວາມໄວສູງ ແທນທີ່ຈະກະຈາຍອອກຢ່າງສະເໝີ, ເຊິ່ງເຮັດໃຫ້ຜະລິດຕະພັນສຳເລັດຮູບມີຮອຍບາດເປື້ອນທີ່ສາມາດເຫັນໄດ້. ຂໍ້ບົກຜ່ອງດ້ານການຜະລິດເຊັ່ນນີ້ມັກຈະໝາຍເຖິງການຖິ້ມຊິ້ນສ່ວນອອກ ຫຼື ຕ້ອງໄດ້ເຮັດໃໝ່ດ້ວຍຄ່າໃຊ້ຈ່າຍສູງໃນຂັ້ນຕໍ່ມາ, ເຊິ່ງກິນເຂົ້າໄປໃນງົບປະມານ ແລະ ເວລາການຜະລິດ.
ການເລືອກລະຫວ່າງປະເພດແຂນຕ່າງໆ ເຊັ່ນ: ແຂນຂ້າງ, ແຂນເຮືອໃຕ້ນ້ຳ ຫຼື ແຂນຈຸດສຸມ ຂຶ້ນກັບຮູບຮ່າງຂອງຊິ້ນສ່ວນ ແລະ ຄວາມສຳຄັນຂອງຮູບລັກສະນະສຳລັບຜະລິດຕະພັນສຳເລັດຮູບ. ລະບົບຮັນເຕີຮ້ອນໄດ້ກາຍເປັນທີ່ນິຍົມຍ້ອນວ່າພວກມັນຮັກສາອຸນຫະພູມທີ່ສອດຄ່ອງຕະຫຼອດຂະບວນການ ໃນຂະນະທີ່ຫຼຸດຜ່ອນຂີ້ເຫຍື້ອວັດສະດຸ ເນື່ອງຈາກຮັນເຕີຍັງຄົງຢູ່ໃນສະພາບລວມ. ໃນການຈັດວາງແຂນ, ຜູ້ຜະລິດຈຳເປັນຕ້ອງຄິດໄລ່ກ່ຽວກັບການຕື່ມຢ່າງສະເໝີພາບໃນແມ່ພິມ, ການຮັກສາການໄຫຼຂອງຢາງພາລາໃຫ້ສັ້ນທີ່ສຸດ ແລະ ຫຼີກເວັ້ນບັນດາບໍລິເວນທີ່ມີຄວາມສຳຄັນຕໍ່ຄວາມສົມບູນຂອງໂຄງສ້າງ. ການເຮັດໃຫ້ຖືກຕ້ອງນີ້ມີຄວາມແຕກຕ່າງຢ່າງໃຫຍ່ຫຼວງໃນການທີ່ຢາງພາລາເຂົ້າໄປໃນທຸກມຸມຂອງແມ່ພິມ, ເຊິ່ງໝາຍເຖິງຄວາມຕຶງຄຽດທີ່ຫຼຸດລົງໃນຊິ້ນສ່ວນສຳເລັດຮູບ ແລະ ຄຸນນະພາບໂດຍລວມທີ່ດີຂຶ້ນ ເຊິ່ງຕອບສະໜອງຕາມຂໍ້ກຳນົດ.
ຖ້າພວກເຮົາຕ້ອງການຫຼຸດຜ່ອນຮ່ອມເສັ້ນທີ່ບໍ່ພ້ອມໃຈເຫຼົ່ານີ້, ວິທີທີ່ດີທີ່ສຸດແມ່ນການວາງຈຸດປະກາດຢູ່ບັນດາບໍລິເວນທີ່ຈະບໍ່ສະແດງ. ປະກາດຊະນິດທໍ່ ຫຼື ປະກາດຍ່ອຍຈະເຮັດວຽກໄດ້ດີຫຼາຍເພາະພວກມັນເກືອບຈະບໍ່ປ່ອຍຮ່ອມໄວ້ ແລະ ສາມາດຕັດອອກໄດ້ຢ່າງສະອາດເວລາອັດຖືກຖອກອອກຈາກແມ່ພິມ. ເວລາເຮັດວຽກກັບຊິ້ນສ່ວນທີ່ຕ້ອງການໃຫ້ມີລັກສະນະດີ, ປະກາດຊະນິດວາວແມ່ນທາງເລືອກທີ່ດີທີ່ສຸດ ເພາະມັນຊ່ວຍຄວບຄຸມໄດ້ດີຂຶ້ນຫຼາຍກ່ຽວກັບເວລາທີ່ປະກາດປິດ ແລະ ລັກສະນະສຸດທ້າຍຂອງຮ່ອມຈະສະອາດປານໃດ. ປະເພດຂອງຢາງກໍສຳຄັນເຊັ່ນດຽວກັນ. ວັດສະດຸບາງຊະນິດພົ້ນຈາກປະກາດໄດ້ດີກ່ວາອັນອື່ນ. ນັ້ນແມ່ນເຫດຜົນທີ່ການສົນທະນາກັບຜູ້ສະໜອງວັດສະດຸໃນຂັ້ນຕອນການອອກແບບຕົ້ນໆສາມາດຊ່ວຍຫຼີກເວັ້ນບັນຫາທີ່ຈະເກີດຂຶ້ນໃນອະນາຄົດ. ບໍ່ມີໃຜຢາກຮູ້ເວລານັ້ນວ່າຢາງທີ່ເຂົາເລືອກໄວ້ປ່ອຍຮ່ອມທີ່ບໍ່ງາມ ເຖິງວ່າຈະມີການວາງແຜນຢ່າງລະມັດລະວັງແລ້ວກໍຕາມ.
ການລະບາຍອາກາດບໍ່ພຽງພໍຈະເຮັດໃຫ້ເກີດຂໍ້ບົກຜ່ອງໃນການຕື່ມແບບສັ້ນ ແລະ ການຕິດຂັດຂອງອາກາດ, ເຊິ່ງອາກາດທີ່ຖືກຈັບຢູ່ຈະຂົວກັ້ນການຕື່ມເຕັມໂຫວດ, ຫຼື ສ້າງຟອງ ແລະ ຮອຍເຜົາ. ການສຶກສາພາຍໃນປີ 2023 ໂດຍຜູ້ຜະລິດໃຫຍ່ຄົນໜຶ່ງພົບວ່າ 65% ຂອງຂໍ້ບົກຜ່ອງດ້ານຄຸນນະພາບພື້ນຜິວມາຈາກການລະບາຍອາກາດທີ່ບໍ່ດີ, ເຊິ່ງສະແດງໃຫ້ເຫັນເຖິງຄວາມສຳຄັນຂອງມັນໃນການບັນລຸຜົນການຕື່ມທີ່ຄົບຖ້ວນ ແລະ ມີຄຸນນະພາບສູງ.
ການໄດ້ຮັບຜົນໄດ້ຮັບທີ່ດີຈາກຊ່ອງລະບາຍອາກາດແມ່ນຂຶ້ນກັບຄວາມເລິກທີ່ຖືກຕ້ອງ ແລະ ການວາງຊ່ອງໃນບ່ອນທີ່ຈະເຮັດວຽກໄດ້ດີທີ່ສຸດ. ຄົນສ່ວນຫຼາຍພົບວ່າຄວາມເລິກປະມານ 0.015 ຫາ 0.025 ມິນລີແມັດເຮັດວຽກໄດ້ດີກັບເທີໂມພາດສະຕິກປົກກະຕິ, ເຖິງຢ່າງໃດກໍຕາມວັດສະດຸບາງຊະນິດທີ່ໜາກວ່າເຊັ່ນ ໂພລີຄາບອນ ຕ້ອງການຊ່ອງລະບາຍອາກາດທີ່ເລິກຂຶ້ນໜ້ອຍໜຶ່ງ. ທີ່ຕັ້ງກໍສຳຄັນເຊັ່ນດຽວກັນ. ຄຳແນະນຳທີ່ດີທີ່ສຸດແມ່ນການວາງຊ່ອງລະບາຍອາກາດໃນບ່ອນທີ່ວັດສະດຸເຂົ້າມາທ້າຍສຸດ, ໂດຍປົກກະຕິແມ່ນຢູ່ທ້າຍເສັ້ນທາງການຕື່ມ ຫຼື ພາຍໃນຖົງນ້ອຍໆທີ່ສັບສົນໃນແມ່ພິມ. ແລະ ຢ່າລືມສ່ວນ 'land' ເຊັ່ນກັນ. ການຮັກສາຄວາມຍາວລະຫວ່າງ 1.5 ຫາ 2 ມິນລີແມັດຈະຊ່ວຍປ້ອງກັນການກົດອອກຂອງວັດສະດຸ (flash) ແຕ່ຍັງອະນຸຍາດໃຫ້ອາກາດອອກໄດ້ຢ່າງຖືກຕ້ອງໃນຂະນະທີ່ກຳລັງອັດ. ລາຍລະອຽດນ້ອຍໆນີ້ມີຜົນກະທົບຢ່າງໃຫຍ່ຫຼວງຕໍ່ຄຸນນະພາບຂອງຜະລິດຕະພັນສຳເລັດຮູບ.
ເມື່ອຈັດການກັບຮູບຮ່າງທີ່ສັບສົນ ຫຼື ຮູບຊົງທີ່ລະອຽດອ່ອນ, ລິ້ນລະບາຍອາກາດຂະໜາດຈຸນລະພາກປະມານ 0.005 ຫາ 0.010 mm ຈະເຮັດວຽກໄດ້ດີຫຼາຍໃນການປ່ອຍອາກາດອອກໂດຍບໍ່ເກີດການຮົ່ວໄຫຼ. ບ່ອນເກັບລົ້ນຈະຈັບວັດຖຸດິບໃນຂະນະທີ່ມັນເຄື່ອນທີ່ໄປຂ້າງໜ້າກ່ອນຈະເຂົ້າສູ່ພື້ນທີ່ການໄຫຼຫຼັກ, ເຊິ່ງຊ່ວຍດັນອາກາດທີ່ຖືກຈັບຢູ່ໄປຍັງຈຸດລະບາຍອາກາດຫຼັກ. ການສຶກສາກ່ຽວກັບການໄຫຼຂອງແມ່ພິມສະແດງໃຫ້ເຫັນວ່າ ວິທີການເຫຼົ່ານີ້ເມື່ອນຳມາໃຊ້ຮ່ວມກັນສາມາດຫຼຸດຜ່ອນຮອຍເຜົາ ແລະ ການຕື່ມບໍ່ພຽງພໍລົງໄດ້ປະມານ 40 ເປີເຊັນ. ຜູ້ຜະລິດແມ່ພິມສ່ວນຫຼາຍທີ່ຮັບມືກັບໂຄງການທີ່ຍາກໆ ພົບວ່າ ວິທີການນີ້ເຮັດວຽກໄດ້ດີກວ່າຫຼາຍໃນການປະຕິບັດຈິງ ເມື່ອທຽບກັບການລອງໃຊ້ທາງເລືອກອື່ນໆ.
ການຈັບຄູ່ພຶດຕິກຳການຫົດຕົວຂອງວັດສະດຸໃຫ້ເຂົ້າກັບຂໍ້ກຳນົດຄວາມຖືກຕ້ອງແມ່ນເປັນຄວາມທ້າທາຍດ້ານການອອກແບບຢ່າງໃຫຍ່ຫຼວງ. ວັດສະດຸທີ່ມີໂຄງສ້າງຜົນເກີດຜົນເຊັ່ນ: ໄນລອນ (nylon) ສາມາດຫົດຕົວໄດ້ເຖິງ 2.5% ເນື່ອງຈາກການຈັດລຽງໂມເລກຸນໃໝ່ໃນຂະນະທີ່ເຢັນ, ໃນຂະນະທີ່ເລືອດຢາງທີ່ບໍ່ມີຮູບຊົງຊັດເຈນເຊັ່ນ: ABS ມັກຈະຫົດຕົວຕ່ຳກວ່າ 0.6%. ຄວາມແຕກຕ່າງເຫຼົ່ານີ້ຕ້ອງການການວິເຄາະການສະສົມຄວາມຖືກຕ້ອງຢ່າງລະມັດລະວັງເພື່ອໃຫ້ແນ່ໃຈວ່າຊິ້ນສ່ວນທີ່ປະກອບເຂົ້າກັນໄດ້ຢ່າງຖືກຕ້ອງ.
ການເຮັດວຽກຢ່າງໃກ້ຊິດກັບຜູ້ສະໜອງວັດສະດຸ ຈະເຮັດໃຫ້ຜູ້ຜະລິດໄດ້ຮັບຄວາມເຂົ້າໃຈທີ່ສຳຄັນກ່ຽວກັບພຶດຕິກຳຂອງວັດສະດຸໃນຂະນະທີ່ກຳລັງດຳເນີນການ. ສິ່ງຕ່າງໆ ເຊັ່ນ: ອັດຕາການຫົດຕົວ, ລັກສະນະຄວາມຮ້ອນ, ແລະ ການຕັ້ງຄ່າແມ່ພິມທີ່ຖືກແນະນຳ ຈະກາຍເປັນຂໍ້ມູນທີ່ສາມາດເຂົ້າເຖິງໄດ້ ເມື່ອມີການສື່ສານທີ່ດີລະຫວ່າງພາກສ່ວນ. ເມື່ອປະສົມປະສານກັບບັນຊີການກວດສອບການອອກແບບສຳລັບການຜະລິດ (DFM) ທີ່ເໝາະສົມ, ບໍລິສັດສາມາດກວດກາທຸກໆດ້ານຂອງຂະບວນການອອກແບບຢ່າງເປັນລະບົບ. ພວກເຮົາກຳລັງເວົ້າເຖິງສິ່ງຕ່າງໆ ເຊັ່ນ: ມຸມເອີ້ນ, ການຈັດວາງແຜ່ນຍືດ, ຕຳແໜ່ງຂອງຊ່ອງລະບາຍອາກາດ, ແລະ ຂໍ້ກຳນົດຄວາມຖືກຕ້ອງ. ຕົວເລກກໍສະແດງເລື່ອງທີ່ໜ້າສົນໃຈເຊັ່ນດຽວກັນ. ຕາມລາຍງານຂອງອຸດສາຫະກຳ, ຜະລິດຕະພັນທີ່ຜ່ານການທົບທວນ DFM ແບບເປັນທາງການ ມັກຈະຕ້ອງການການດັດແປງດ້ານວິສະວະກຳໜ້ອຍລົງປະມານ 30 ເປີເຊັນໃນຂັ້ນຕອນຕໍ່ມາ. ແລະ ປະມານ 85 ໃນ 100 ເທື່ອ, ຜະລິດຕະພັນເຫຼົ່ານີ້ຜ່ານການທົດສອບແມ່ພິມຄັ້ງທຳອິດໂດຍບໍ່ຕ້ອງການການປັບຕົວຄັ້ງໃຫຍ່.
 ຂ່າວຮ້ອນ
2024-04-25
2024-03-06
2024-03-06
2024-03-06
2024-03-06
2024-08-09
ຜະລິດຕະພັນຫຼັກຂອງ WishSINO ແມ່ນແມ່ພິມແບບອັດ, ການອອກແບບຜະລິດຕະພັນ ແລະ ການພັດທະນາ, ການພິມ 3D, ຜະລິດຕະພັນແບບອັດພลาສຕິກ, ແມ່ພິມ IMD, ແລະ ອື່ນໆ
ລິขະສິດ © 2024 ໂດຍ WishSINO Technology Co., Limited ນະໂຍບາຍຄວາມເປັນສ່ວນຕົວ
 EN
EN
 AR
AR
 HR
HR
 CS
CS
 DA
DA
 NL
NL
 FI
FI
 FR
FR
 DE
DE
 EL
EL
 IT
IT
 JA
JA
 KO
KO
 NO
NO
 PL
PL
 PT
PT
 RO
RO
 RU
RU
 ES
ES
 SV
SV
 TL
TL
 ID
ID
 LT
LT
 SK
SK
 SL
SL
 VI
VI
 TH
TH
 TR
TR
 AF
AF
 MS
MS
 GA
GA
 BN
BN
 HMN
HMN
 LO
LO
 LA
LA
 MI
MI
 MN
MN
 NE
NE
 MY
MY
 UZ
UZ